Click on any picture to enlarge...Comments are invited on individual pictures, or entire album...You may comment anonymously if you choose..
One of my oldest friends gets the credit for naming my unique method of cleaning guns...His reasoning will become apparent as the article progresses...Following the rekindling of my interest in firearms in 2019 after a 12 year hiatus for other interests, and the restart of my gun collection, finally centering on 20th Century Smith & Wesson revolvers, I joined the Smith-Wesson Forum, one of the premier sources for S&W information anywhere...Regaining confidence in my knowledge and experience with firearms, the members of this fine group reinforced my admiration of the works of art the S&W organization has produced since 1852...My love of history led me into the pastime of preserving as many of these fine revolvers as possible, and encouraging others of the same mindset...I developed my own admittedly time-consuming inspection and cleaning method which I perform on each new acquisition...Posting some pictures on the forum drew favorable comments, and the suggestion that I write this article about my procedures...
Bear in mind, I am not an expert, and in no way can I be considered a professional...This is my way of cleaning a newly acquired gun...I use this same process on each gun I own...I have the time to do this, while others might not...Feel free to either copy, ignore or modify my methods to suit your own...
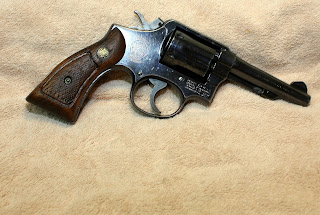
Let's begin by looking at our subject revolver, an example of the ubiquitous S&W Model 10, a continuation of the S&W Hand Ejector in production since 1899 with no breaks in service, a 123 year tradition...This one is a Model 10-5, meaning the fifth engineering change since the redesignation of the S&W Military & Police revolver to the Model 10 in 1957, still chambered in the same .38 Special cartridge as the original design of the 19th Century...This example was acquired from a known associate of mine who has carried it in his truck and on his person for many years...The pictures will show that it has been exposed to the humid and changeable Texas weather for a long duration, and has the many handling marks of any other well-used and frequently shot firearm...
The imitation mother-of-pearl grips were added by the former owner to add a little eye appeal in his attempt to re-home his old companion...
The effects of exposure to Texas weather are evident in the many areas of surface rust and corrosion on the steel parts...
However the function of the gun was not affected as timing, cylinder endshake and lockup were good with no hammer pushoff detected...
Some normal wear can be expected in ordinary use over the service life of any gun, but this one passed my cursory inspection...
No major parts seem to have been replaced, nor are any expected to in continued normal usage for this old warrior...
The bore shows normal wear with no bulges from shooting squibs detected...No signs of overpressure...
Surface rust is evident on almost every surface, but no deep pitting...
Under the grips we find more evidence of constant exposure to Texas humidity...
The tools of the trade...Flitz, available in tubes but I buy it in 2 pound cans...Simichrome and Renaissance Wax...Toothpicks and Q-Tips for cleaning nooks, crannies and tiny hiding places...Dewey rods (accept no substitute) and various brass/bronze bore brushes, patch holders and jags...Plenty of 100% cotton patches of various sizes (much cheaper in large quantities)...Brownells hollow ground screwdriver set with all bit sizes...WD40, both spray cans and one gallon bulk cans (5 gallon bulk cans are also available)...Any good light lubricating oil...Plenty of clean, dry cotton rags...For wood grips, I like Old English dark scratch cover and Howard's Feed 'n' Wax...Lastly a comfortable work space - you'll be here a while...

I should add at this point that for heavily soiled, neglected guns with flaking finish or sticking mechanisms it might be advisable to presoak the entire gun in a 50/50 mixture of Dexron III automatic transmission fluid and acetone...Let the gun (minus the grips) soak as long as is necessary, even a couple of weeks...Do this in a sealed container to prevent evaporation...No harm will come to the finish or any metal parts...Loose scale and rust will dissolve...Afterwards, after the gun has dried we may proceed to scrubbing...I start with the bore and the cylinder chambers with a Dewey rod (coated to prevent bore damage), a bronze bore brush and Flitz...Heavily leaded bores may need scrubbing or soaking with Hoppes #9 and copper deposits may need Shooter's Choice solvent to loosen and wipe away...However caution must be taken with any ammonia based solvent as some finishes based in copper, such as bumper chrome or some nickel plating procedures, may be irreparably damaged by exposure to ammonia...Patches cut from a LeadAway cloth can successfully remove lead and copper deposits from barrel bores and cylinder chambers, but caution is advised as this is an abrasive material which can and will remove the gun's finish if used aggressively...My preference is Flitz which will not harm hot bluing nor plating, but will remove cold bluing...

Following the bore and chamber scouring, I move on to the other surfaces of the cylinder...I like to remove as much of the burn rings on the front and then clean the charging end plus under the extractor which is always filthy...
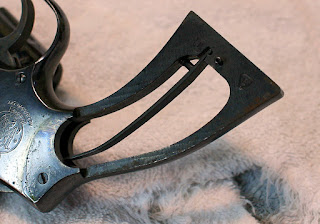
After scrubbing the cylinder release thumbpiece, I remove and set it aside to clean the area under it...
Heavily soiled rubber grips can be cleaned easily with a toothbrush and Flitz...Rinse afterward and let dry...Old grime and rust will turn the normally blue Flitz into a yellowish or brown color...
No area visible from the outside goes untouched by toothbrush and Flitz...
At the end of the Flitz scrubbing, the brush and towel are ready for their own cleaning session...
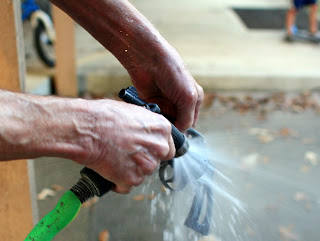
This is the part that makes most people cringe as I direct my garden hose on the Flitz covered steel...Yes, we know from high school chemistry class that water and steel left together will yield rust...But we will guard against that...
Some may wonder who is operating the camera...Since sharp-eyed readers have noticed both my hands are occupied, I enlisted my young, lovely and talented assistant to shoot the photos, while her son steadfastly guarded his scooter and bicycle from getting wet...
Prior to using the water jet method, I washed the Flitz residue away with spray cans of WD40, which contrary to claims of being a lubricant it is nothing but a cleaner and a water dispersant...I'm also told it can function to neutralize the corrosive salts formed from shooting ammunition with mercuric primers, but this is unconfirmed by me...After spraying away the Flitz I used to finish by spraying away the WD40 film with non-chlorinated brake cleaner...
That was not only wasteful and messy but far more expensive than tap water from the hose...And I believe the higher pressure from the hose is also more efficient in residue removal than the lower pressure spray cans...
The explanation for preventing new rust, and the reason for the Dunkin Gunwash label will be made evident in the next step...
I spray every exposed surface with the water including the bore, cylinder chambers and behind the extractor...
Here we have a water saturated steel revolver showing its gray coating left behind by the film of Flitz...
The source of my method's name is now revealed as we prepare to soak the gun in a bath of water dispersing WD40, first developed for government use during WWII primarily to disperse water from under the distributor caps of military vehicles in inclement weather, allowing them to run and perform the job for which they were designed...The product we know today was the 40th formula used before it was deemed a success and accepted for use by the US government...
WD40 is not only available in the familiar spray cans of various sizes, but also as a liquid in one gallon and five gallon cans...Larger orders than that can be arranged at the factory, but I prefer the one gallon size for its ease in handling...It's available at Lowe's or Amazon...

It comes out of its container in a brown/yellowish cloudy color...After much use, in my case 60 to 80 guns, The old Flitz, rust flakes and grime collect in the bottom of the bucket as a granular residue...At this point, having saved a bundle of money by not buying the spray cans, the user can simply dispose of the bucket's content in a safe, ecologically responsible manner, or you may wish to recycle in a less costly procedure...I use a spare two gallon bucket and the colander repurposed from my own kitchen...After lining the colander with a towel, I pour the contaminated WD40 from one bucket into the other, allowing the time needed for the WD40 to filter through the towel...I repeat the process with clean towels as necessary until the liquid returns to its original consistency...Then I add enough from another new can to bring to bring the bucket to it's original one gallon level...The residue is of course discarded in an ecologically friendly, EPA approved manner...

The level is sufficient to cover small revolvers completely...Larger guns will not submerge completely...I begin by dunking (hence the name) the gun muzzle first into the solution, swishing it around to expose the inner and outer areas of the barrel...Afterward I reverse the direction of the gun, dunking and swishing the remainder of the steel and leaving it submerged to soak (usually overnight)...Before closing the lid to prevent evaporation, I use a spray can of WD40 to make certain the inside of the barrel is washed clean of water and residual Flitz...
Following the soak period, I let the gun drain through the colander back into the bucket...
This allows the reuse of the maximum amount of WD40...
Here is the gun after it's soak...
Next we remove the oily film left by the WD40 by spraying all surfaces with quick-drying, non-chlorinated brake cleaner...
Following this the gun is allowed to dry...The metal will be cold to the touch from the sudden evaporation of the brake cleaner...Much of the surface will appear grayish in color...I also take this opportunity to sparingly lubricate the moving parts with a quality lubricant...
I like to begin the next step by running several patches through the barrel and the cylinder's chambers...No matter how clean the interior looks, you will nearly always find dirt on the patches after use...
A comfortable place for this step will make the next part of the job, applying the polishing compound and wax by hand, much easier...
I chose to replace the faux pearl grips with something more period correct, although with considerable wear, just like the gun...
These stocks are PC Magnas, original equipment on Model 10's produced in the mid-1970's...
The following photo sequence shows the gun after having most of its surface area polished with a coat of Simichrome...
Under ordinary conditions, I don't use Simichrome inside the cylinder window, but in this case I did to improve appearance...
Following the application of Simichrome, and before buffing the surfaces, I recommend swabbing out the bore and chambers again with several patches before the paste hardens...You can thank me later for this extra step when you find it unnecessary to laboriously scrape out the chambers with a toothpick and then polish each one separately with a Q-tip...
Next after the paste has dried, it's time to buff each surface with a soft rag, methodically removing all traces of Simichrome...
Now the revolver is beginning to look more like what we envisioned...
At this time we have also polished the walnut grips with Howard's Wax, restoring some, but not all of their former lustre...
These grips were used by a right handed shooter which explains the heavy wear on the right grip...
Next we see the gun after the removal of Simichrome, followed by an application of Renaissance Wax on all surfaces...
This product was developed by and for the British Museums to preserve the ancient steel and iron armor which they display...It is available through Brownell's or Amazon...
Again it is recommended to swab out the barrel and cylinder chambers before the wax hardens...This step also puts a preservative coat of wax on the interior of those parts...
I can also recommend cleaning under the extractor star with Q-tips multiple times during this process to remove the filth which accumulates there...
Now it's time to reinstall the grips and the thumbpiece, and admire the results...
Bear in mind what we started with and I believe you'll agree the finished product is worth the effort...
The heavily corroded areas and rust pits remain, but the overall improvement is startling...
Nearly no trace of the burn rings on the cylinder face remain, but the bluing is intact...
I use this exact same procedure on each gun I acquire, regardless of its condition when I accept it...
Thank you for reading this, and I hope I've been of some help to you...Your questions and comments are welcome below...